|
|
 | | In Part 1:
Introduction
File Menu
Movies
Filters
Search
View
Bookmarks
| - The bookmarking feature is intended for any temporary tagging need. They only can be easily set or removed or all cleared, so they're ideal for marking items in the process of being updated or reviewed. The bookmark filter can be used to list them, or exclude them from the list. Or Next/Previous used to navigate between them.
- Because they are volatile, they should only be used for temporary needs—normally tasks to be completed in the same session. For more permanence, use the Loans manager feature (i.e., "loan" the items to "My bookmark") or consider adding a custom checkbox field to record the attribute of interest.
| |
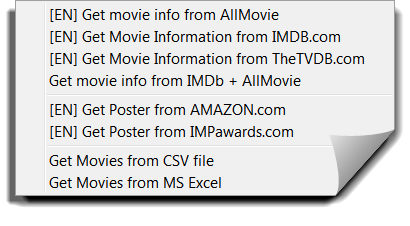
Import
| - All of the import plugins and scripts included in the program appear on this menu. To remove unwanted items, remove them from their installation folders (or add an .XXX extension to disable them) and restart the program.
- Each item is listed in Preferences>Plugins. Verify plugins are configured correctly before attempting to run them. One plugin of each type (e.g., movie information, poster, people information) is designated as the default. This plugin may be run using the assigned hotkey or toolbar button.
- Where applicable, the operation of the menu item applies to the selected items in the List. The Status Bar will indicate the progress of an import currently running.
| |
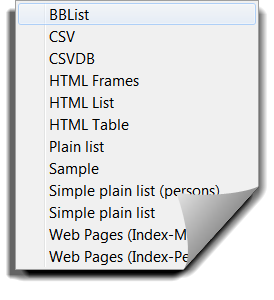
Export
  | - Each item on the export menu represents a template included in the Plain text Export plugin. Each template is listed in the configuration dialog at Preferences>Plugins>Plain text Export. The templates themselves are saved in the \Plugins\Templates folder.
- Use the configuration dialog to add, edit or delete templates. A copy of an existing template is easily be made by creating a new template, and then copying and pasting the contents of the existing template. One plugin is designated as the default and may be run using the assigned hotkey or toolbar button.
- For all templates, the export applies to all items currently displayed in the List. Use Filters or Advanced search to restrict the List to items you wish to export. The Status Bar will indicate the progress of the export. When done, most templates will prompt for a filename, and then display the results in the associated application.
- Export templates are used to create reports suitable for printing—using whatever application is available for viewing the results (browser, text editor, word processor, etc.). PVD does not include its own print function.
| |
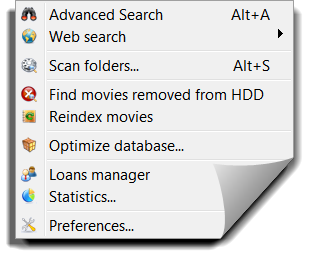
Tools
| - The Search bar allows the search of any one selected field. Use Advanced search to perform a complex Boolean searches involving any number of fields and conditions.
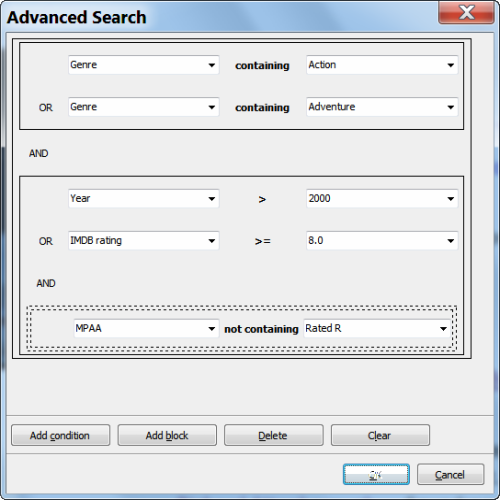
- Select any field from the drop-down box.
- Change the operator by clicking it.
- Enter a search term or (for list fields) select one from the drop-down box.
- Use Add condition to add another condition.
- Use Add block to group conditions (to change the order they are evaluated in).
- The selected item is enclosed in dotted lines.
- Use Delete to remove the selected object, or Clear to clear the entire search.
- Click OK to perform the search.
Movies matching the search appear in the list. Clear the results by clicking the refresh button on the Search bar (to the right of the search box). This will not clear the search—it will still be available in the Advanced search dialog to run again or modify.
- A Web search searches for the Original title (or person's Name) of the selected item using the search facility of the specified web site. The term to search for can be changed manually in the search box. Click the search name button to select a different search. The searches may be added to or modified using Preferences>Web search.
- Scan Folders first presents a dialog for selecting the folders to be scanned. Default folders may be set at Preferences>File scanner. The routine scans the selected folders for new or changed media files, and presents a Scan Results dialog:
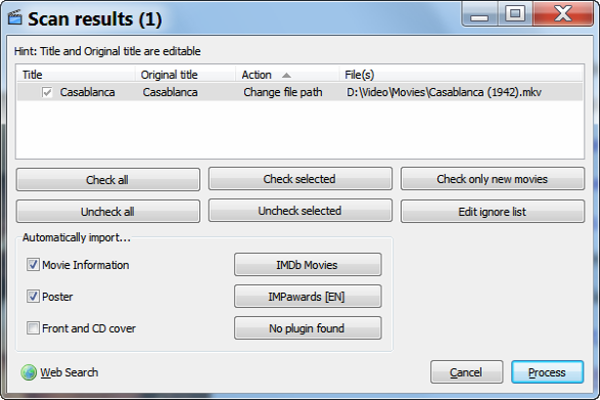
- The command must be configured so it understands your file naming conventions. This is explained more fully in *Scanning Media.
- It will show a list of items found, and a proposed action ("Change file path" or "Add new movie/episode") for each of them. If incorrect, these actions may be changed using the context menu.
- Use the check boxes and controls provided to select which items to process, skip or ignore.
- Select the items to be Automatically imported and the plugins for doing so (clicking the buttons to select). These settings will be used the next time the routine is run.
- When satisfied with your settings, click Process to complete the operation.
- Find movies removed from HDD is sort of like a Filter in that it removes from the List all movies that have a valid File path recorded. The Scan folders routine should correct the references to files that have been moved or renamed. So anything left on the list should either be a movie for which there never was media, or for which media no longer exists.
- The program supports the optional use of a sequentially assigned Movie ID. Re-index movies will re-index all movies visible in the List, in the order they appear. Be very careful with this command if you choose to use Movie ID as a reference to your physical media. Media label and/or Media location might be a better choice for this purpose.
- Optimize database searches for and deletes duplicate and orphaned records. It then uses the backup and restore functions to effectively remove the space that was occupied by these records in a process called "garbage collection." Your database will perform better if occasionally optimized.
- Movies may be Loaned and loaned movies Returned using those commands on the Movies menu. The Loans manager shows a User (borrower) summary with controls for adding or removing users, and a borrow/return history by movie:
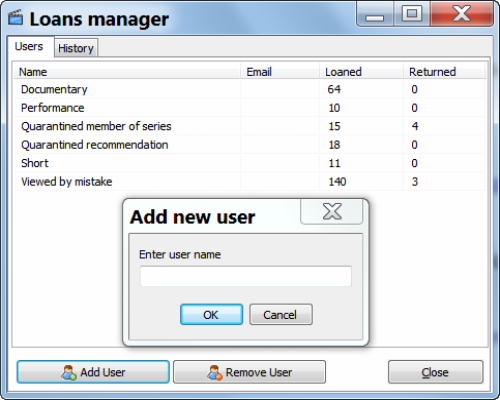
- This example shows the Loans feature being used for an alternate purpose. The Users are not borrowers, but various types of videos. The feature is being used to "tag" them so they can be hidden or displayed using the Loan filter, with the "borrower" indicating the reason for doing so.
- The Loan command allow a borrower to be selected or, if new, entered, and the number of days to loan for to be selected.
- When a movie is loaned, a Borrower field appears in the information panel, indicating the borrower and date borrowed.
- Borrowed movies may also be colored in the list (the default is red).
- Statistics produces a simple statistical "snap shot" of your database. It cannot be modified, printed or saved. This feature is unlikely to be developed further, as the database itself can be used to generate more useful descriptive statistics dynamically.
- All of the program's configuration settings and user options are managed using the Preferences dialog.
| |
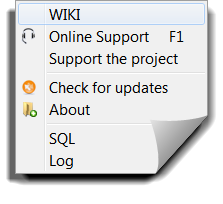
Help
| - Links:
- Check for updates will advise you of any updates for the program, plugins, scripts or skin.
- You can see the credits in About...but they don't scroll!

- Starting the program with the -debug switch adds two commands to the menu. SQL is for running queries and scripts directly on the database. Log records all plugin activity—all the messages that appear in the status bar as a plugin is running. If there are any problems, the log will often be helpful in identifying what went wrong.
| |
[attachment deleted by admin] |
|


 Commands - Part 2
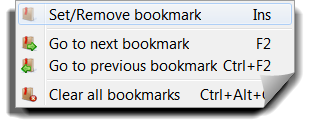


Reserved